Author Archives: myrainbowkitchen

Mango Shreekhand

Standard

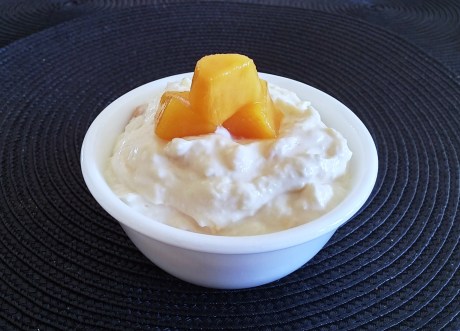
Shreekhand is an Indian dessert made with hung yoghurt or greek yoghurt and sugar. Now this recipe is my friend Madhvi’s recipe and I have always been a major fan of it. It is so amazingly tasty, so light and fluffy and melt in the mouth. So I asked her for the recipe as I was having some guests over and wanted to try it for myself… and it was a roaring success. Cant wait to make it and gorge on it again!

upload

Serves 6-8

Ingredients:

1.5 kg yoghurt (make sure its not sour)

30 cashews

30 almonds

Sugar half the quantity of yoghurt after being hung

One mango, or about 2 cups of chopped mango

1 cardamom

saffron strands

Method:

  • Soak the almonds overnight in water and peel.
  • Hang the yoghurt in a muslin cloth or around 4-5 hours till all the water has drained out. Then put it in a big bowl
  • Add sugar, which should be about half the quantity of the hung curd.
  • Crush the almonds and cashews. Add them, cardamom and saffron to the curd.
  • Either with your hands or with an electric mixer, beat the yoghurt till light and fluffy. Add the mangoes and mix well.
  • Put in fridge to cool and serve chilled.


Healthy iron laden Veg soup

Standard

The main sources of iron in this super tasty soup are spinach and beetroot. We are not boiling beetroot with the rest of the vegetables because we want to maintain the colour of the beetroot, which we will lose if we boil it.

upload1

Serves 2 for mains, or 4-5 as starter

Ingredients:

tomatoes – 3 medium

spinach leaves – 1 1/2 cup (about a handful)

cauliflower – 1/2 cup ( or a floret)

1 garlic clove

1 small onion, chopped

2 small or 1 medium carrot

Salt to taste

Chilli flakes to taste

Black pepper

1 veg stock cube (optional, but lends very good flavour)

1/2 cup finely chopped mixed peppers

1/2 cup peas.

1/2 cup chopped boiled pasta/spaghetti

1 small raw beetroot

1 tablespoon butter (because some fat is needed by everyone 🙂 )

Method:

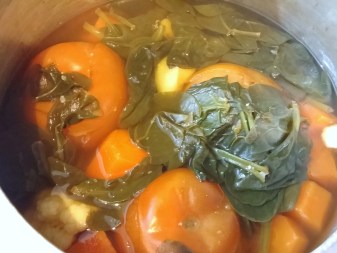
  • Boil the tomatoes, spinach, carrots, garlic and cauliflower together. There is no need to chop the tomatoes, but roughly chop the carrots.

upload

  • Once boiled and bit cooled down, puree the boiled vegetables with 1 small raw beetroot.
  • Heat the butter in a pan and fry the onions.
  • Then put the soup in the pan. Add one stock cube and water as per your requirement, whether you want a thick soup or thin consistency.
  • Add the peas. Cook till peas are tender.
  • Add the chopped peppers, chilli flakes, salt, black pepper and boiled pasta. I dont like to cook my peppers a lot but you can cook them till they are soft.
  • Hot soup is ready!!

Hariyali Mutter Mithai Platter (Masterchef India recipe)

Standard

So, I have been very very busy past few months with my cake making and have not been trying out new things in the kitchen, hence the very delayed post. I love watching Masterchef Australia and I think its the best of the series across all the countries that have its counterpart. However, Masterchef India is also something I quite like to watch, even if for the dramatics 🙂 But theres no denying the fact that the recipes and dishes seem very mouth watering. And this time, Masterchef India 4 is actually all vegetarian… what a bonus for a vegetarian like me! So the first week in, and the contestants had to experiment with the core ingredient – peas. Lots of lovely ideas all around, but the winning dish was Neha Deepak Shah’s Hariyali Mutter Mithai Platter (Green peas sweet platter, essentially).

20150222_211618

I was following the masterclass episode I recorded on sky and unfortunately there weren’t proper measurements for the whole dish. Some measurements were mentioned, but some I had to eyeball. And a few little touches I added of my own. Two of my favourite elements in the dish are the Halva and the mousse…And these 2 together, heaven, I must say. The others..hmmm.. in my opinion (and that of the guests a.k.a. the guinea pigs) the coulis leant no help to the taste at all, although looked very pretty.

One word of warning though, before we start. Its a rather long recipe and if you don’t care about the looks, leave the coulis and the chiki alone. Then, you have even more of a winner. Awesome, now lets begin!

Serves 5 when presented as shown in the picture

Ingredients:

Peas – 4 cups, blanched and pureed with little bit of water (these will be used in the overall recipe, not just the halva)

For the halva:

Peas puree made above – 3 cups

Condensed milk – 1 tin

Ghee – 2 tablespoons

Cardamom powder – 2 teaspoons

Saunf powder – 2 teaspoons

Almonds deskinned and cut in slivers – 1 tablespoon

For the Mousse:

White chocolate – 100 gms

Double cream – 100 gms (for the ganache)

Double cream – 300 ml (to whip)

Rose petals – 5, washed and cut into slivers

Saunf powder – 1 tablespoon

Pea puree made above – 5 tablespoons

For the coulis:

Apple – 1/2, cut into pieces

raw Beetroot – 1/2 cut into pieces

Sugar – 2 tablespoons

Chikki:

Almonds deskinned and cut in slivers – 1 tablespoon

Sugar – 100 gms

Some water to sprinkle

Shortbread:

Butter (not melted) – 75 gm

Caster Sugar – 40 gm

Plain flour – 150 gms

Peas puree made above – 3-4 teaspoons to bind

Method:

For the halva:

  • Put the ghee in a non stick pan and heat. Add 3 cups of pea puree and fry till it starts leaving sides.20150222_152340
  • Add the condensed milk and cook till done, it will start leaving sides and start coming together. Will look almost dry. Make sure you stir continuously as it might stick to the bottom of the pan.
  • Add the cardamom, saunf and almond and set aside to cool down, then put in the fridge to set.

For the Mousse:

  • Break the white chocolate into pieces.
  • Heat the 100 ml cream on low heat over a pan till almost comes to a boil. Add the chocolate and mix well to make the ganache. Set aside to cool a bit. Whip when cool.
  • Whip the 300 ml cream and set aside.
  • Add the pea puree, saunf powder and rose petals to the ganache made above, lightly folding it in.
  • Finally, fold in the whipped cream to the prepared ganache. Mousse is ready.

For the Coulis:

  • Blanch the apple and beetroot to maintain the color.
  • Puree when cooled down.
  • Put the puree in a pan and cook with the sugar till well reduced and a spreadable consistency. Coulis is ready.

For the chikki:

  • Prepare round tin moulds by smearing with oil from the inside to pour the caramelised sugar in.
  • Put the moulds on a baking paper on a tray. Add some almonds in each mould. Dont worry if you have different shaped moulds, we can break the chikki and put it on each serving.
  • We are going to caramelise the sugar. Put the sugar in a pan and sprinkle with very little water (few drops).
  • Let it cook on low heat.
  • It will start caramelising from the sides. Do not stir at all the sugar will crystallise again.
  • It will start turning brown, remove it from the heat when almost 95% of the sugar is caramelised. The rest will caramelise by the remaining heat.
  • Pour the sugar into each mould and leave to set.

For the shortbread:

  • Chop the butter into pieces and add the sugar. Lightly crumble and mix together.
  • Add the flour and lightly mix together to resemble bread crumbs.
  • Add the pea puree little by little so as not to make it too wet. We dont have to knead it together as that will overwork the flour. Just pull everything together.
  • 20150222_180413
  • Put in between 2 pieces of floured butter paper and pat into a disc. Put in the fridge to set for 30 minutes.
  • Take the chilled dough out and roll (still between the floured butter paper) into about 1/4 inch thick disc. Cut into rounds using a round cutter. You will be able to get 10 rounds out of this, about 3″ in diameter.
  • Bake at 180 degree celsius for 20 minutes.

To assemble:

  • Take the halva out of the fridge, spread on butter paper into a 1/4 inch thick disc. Cut into 10 rounds using the same cutter as the shortbreads.
  • Arrange 1 shortbread, then the halva, then pipe on the mousse and repeat the layers. Finally top it with broken pieces of chikki. Smear the coulis on sides to give that chic look!
Badam Paneer Kheer

Standard

This was my hit and trial recipe, when you think everything is going wrong but turns out fab in the end. Disaster turned success. Few things happened that I wasn’t expecting to happen, but really pleased with how this turned out, perfect sweetness, perfect thickness, perfect colour and a perfect ending to a dinner party…Loved it!!

upload

Serves 8

Ingredients:

Whole milk – 8 cups

Saffron – 1 pinch, dissolved in 1 tblsp of milk

Boiled rice – 1 cup, packed

Sugar – 1 1/4 cup

Cardamom powder – 1/2 tsp

Yellow food colour (optional)

Almonds –  3/4 cup.

Paneer – 150 gms

Method:

  1. Soak almonds overnight in water and remove skin.
  2. Put milk to reduce in a heavy bottomed pan. Keep boiling at low heat till reduced about 3/4, stirring frequently.
  3. Meanwhile put the rice, almonds and paneer in a mixer with some milk or water and make an almost fine paste, leaving just a teeny bit of texture.
  4. Then add this paste to the boiling milk, still at low heat. Cook till thick and half reduced, keep stirring all the while making sure it doesn’t stick to the bottom of the pan. It will be nice and thick by this point. It takes a while, took me about 3 hours from start to finish, you just can’t rush this process!
  5. Then add saffron dissolved in milk, food color if using and cardamom powder.
  6. Remove from heat and add sugar. Bring at room temperature, then leave in fridge for few more hours to thicken further.
  7. Tastes best chilled, but can served warm as well.


Cinnabons (Cinnabon Rolls soaked in cream cheese icing)

Standard

I am quite a huge fan of cinnamon and love it in cakes, rolls and sometimes even my coffee. I had these lovely Cinnabons at a shop and instantly fell in love with them. They are gooey cinnamon rolls, drenched in cream cheese icing. I think it tastes best warm with the icing drizzled over, but you can also eat it without the icing if you don’t want them to be too sweet.

upload


Makes 15 rolls

Ingredients:

For the dough:

Warm water – 180 ml

Milk – 70 ml

Active dry yeast – 3 3/4 tsp

Sugar (white granulated)- 2 tsp

Caster Sugar – 90 ml

Plain flour – 600 gm + more for dusting

Eggs – 2, medium

Butter – 75 gms

For the filling:

Dark brown sugar – 200 gm

Cinnamon powder – 2 tblsp

Butter, melted – 50 gms

For the icing:

Cream cheese at room temp – 100 gm

Butter, softened – 50 gm

Icing sugar – 200 gm

Vanilla essence – 1/2 tsp

Salt – 1/4 tsp (Can be omitted if you are using salted butter)

Milk – 2 tblsp

Method:

  1. Mix the warm water and 2 tsp sugar together and sprinkle the yeast over it. Stir briskly and leave to froth for 10-12 mins.
  2. Meanwhile, put all the other ingredients in a large bowl, big enough to allow the dough to double up in size later.
  3. Once the yeast is ready, add it to the ingredients in the bowl, and knead it into a large ball.
  4. Cover with a wet towel and leave to rise for an hour, it would double up in size.
  5. While this is happening, make the filling. Mix together the brown sugar and cinnamon and mix well.
  6. Dust your worktop with some flour. Once the dough is well risen, take it out of the bowl and put it on the well dusted worktop.
  7. Now you need to roll it into a rectangle not thicker than 1/4 of an inch. If you think you dont have enough space for this, you can divide the dough in two, and roll in two batches.
  8. Now properly brush the rolled dough with butter. Cover evenly with the cinnamon filling. Carefully roll from one side to the other, making a log. The trick is to keep everything well dusted with flour. Now cut into slices about 2 inches thick.
  9. Place into a 12″ large baking pan, leaving some space between the rolls to allow them to rise.
  10. Leave these rolls for about 30 minutes in a warm place to rise. Meanwhile, preheat your oven to 190 degrees C.
  11. Bake at 190 degrees C for about 10-15 minutes. Mine were done in 12 minutes, but it might take longer for yours. Watch the tops, as soon as they start turning golden brown, they are done. upload1
  12. While they are baking, you can prepare the icing. Mix together all the icing ingredients. I used a hand held whisk, and beat well till smooth and non lumpy.
  13. To serve, warm the rolls slighlty in microwave, and drizzle over some of the icing. And enjoy!

Notes:

  1. If you have bread flour, go for it instead of the plain flour but if you dont, plain flour works just as well.
  2. Sometimes you have a different type of yeast than called for in a recipe. You need not buy any more yeast, just follow this conversion calculator and bake away. I have followed it a number of times, with brilliant results every time.  http://www.traditionaloven.com/conversions_of_measures/yeast_converter.html
  3. To make my dough rise really well, I do this little trick. I turn my oven on at 200 degrees C for about 5 minutes then turn it off. Then put my dough (in an oven safe bowl) inside the warm oven. And my oh my does the dough rise!!
  4. For the filling, its ok if you have light brown sugar, or a mixture of both. Tastes great nonetheless.


Chilli Pickle

Standard

When I was little, I used to see my dad eating chillies and onions with his food. He could miss his food, but not chillies and onions. I guess in this way, I am totally on my dad. I LOVE chillies..not so much onions. But chillies, thats another story. Totally different. My no meal goes without chilli, none. At all. Its not allowed, I dont allow myself 🙂 There is even a distinction that with some things I would only eat raw chilli, and with some it has to be chilli pickle. No variations..hehe…rigid, I know…but I sooo love it!

So normally I get chilli pickle from the market and have a larder full of chilli pickles. Different varieties and brands, just to try which ones are the best. I have now kind of decided on the brand I love, its actually Mother’s recipe Chilli Pickle. Just the way I like, very spicy, and not overloaded with vinegar. However, despite all these tests and experiments, there have been times (oh, the utter horror!) when I didn’t have chilli pickle on me!

That’s when I made it at home, because I had raw chillies, of course. But needed chilli pickle, of course!

Chilli Pickle besani (2)

Ingredients:

Besan (Gram flour) – 1 tablespoon

Green chillies, chopped – 10

Olive oil – 1 tablespoon

Saunf powder – 2 teaspoons

Mixed powder made of equal amounts of black peppercorns and rai (brown mustard seeds) – 1-2 teaspoons

Salt – to taste

Method:

Put the olive oil in a pan and heat. Add the besan to it, and stir till brown. Add the green chillies and fry for a while till little brown. They might really smoke at this point, keep the exhaust fan on and windows open!

Add the saunf, salt and mixed powder. Mix, and remove from heat. Serve with food!

The mixed powder is quite hot, use as per taste.

One variation is that you can skip the besan. Just fry the chillies in oil, add the powders and eat 🙂

You will note that there is also some red chilli in the picture above, I had some so I put it in. Equally good 🙂


Devil’s Food Cake

Standard

Chocolate cake. There are endless recipes, and endless varieties, all taste brilliant… After all, its chocolate, what’s not to love!

This recipe is adapted from Nigella Lawson, I made very minor changes depending on what I had or didn’t have. The result is still brilliant, quite spongy, quite moist. One of the changes I made in the frosting was that I didn’t use dark chocolate as I didn’t want it to be too bitter.

Another point to note is that the frosting will seem to be too runny to be used as a frosting. It will be runny for a long long time if you leave it at room temperature to firm up. So I put it in the freezer 🙂 15 minutes, and it was where I wanted it. Not runny at all, but not brick hard as well. Smooth to touch, but I was able to frost the cake quite smoothly with it as you can see.

upload3


Makes an 8″ cake.

Ingredients:

For the cake:

Cocoa powder – 50 grams
Dark brown sugar – 100 grams 
Boiling water – 250 ml 
Soft butter – 125 grams
Caster sugar – 150 grams 
Plain flour – 225 grams
Baking powder – ½ teaspoon 
Baking soda – ½ teaspoon
Vanilla extract – 2 teaspoons 
3 medium eggs

For the frosting:

Water – 125 ml
Dark brown sugar – 30 grams
Butter – 175 grams
Dark chocolate or Milk Chocolate (I used milk chocolate), broken into equal pieces – 300 grams

Method:

  1. Preheat oven to 180 degrees C. Prepare an 8″ pan or two 8″ sandwich pans.
  2. Mix together the dark brown sugar, cocoa powder and boiling water. Briskly stir to mix and set aside.
  3. Sift together the flour, baking powder and baking soda and set aside.
  4. Cream the caster sugar and butter until light and fluffy. Add the vanilla essence, and the eggs, one at a time. Keep whisking. Then add the sifted flour. The finally fold in the dark brown sugar mixture.
  5. The batter will be extremely runny. Pour in well greased pan and bake at 180 degrees for 30 minutes or until a skewer inserted into the centre of the cake comes out clean.
  6. While the cake is baking, make the frosting. Put the water, sugar and butter in a pan and bring to boil. Remove from heat and add the broken chocolate. Swirl the pan so that the chocolate is fully covered by the liquid. Leave for a while to allow the chocolate to melt.
  7. Then whisk with a spoon, mixing properly. You can either leave at room temperature to thicken if you have time or put in fridge/freezer to set quickly.

I sliced my cooled cake horizontally and put frosting in the centre and on the sides. I decorated with chocolate shards and piped some roses with ganache. You can just frost it and serve it as such, it tastes amazing just like that!

IMG-20140612-WA0004


Chocolate Shards

Standard

There are so many ways chocolate can be used for decoration, and I am only starting to learn few of them. I have done chocolate collars a few times now and am fairly confident in making them. This time when I was asked to do a chocolate cake, I started trolling through various images online to find out what could be done. And my oh my, there are so many things which I wouldn’t even dare attempt at the moment, but these shards looked good. Apparently there are (at least) two ways of making these shards, and I will be writing about the method I used.

I used the shards to decorate this Devil’s Food cake.

upload5


Ingredients:

Dark Chocolate, Milk Chocolate and White Chocolate – Cubed

Method:

Melt all three chocolates in separate bowls, either in microwave or a double boiler. If melting in a microwave, heat for only 30 sec bursts and stir constantly. Stop when most of the chocolate is melted, stir briskly to melt all the remaining chocolate.

Take a large square piece of baking paper and put on a movable surface, like a tray. Drizzle dark chocolate, then milk, then white all over it. Then hold the tray and paper up carefully, trying to sort of let the chocolates merge a little bit into each other.

upload

Now put the tray in the fridge to set for an hour.

Take another square piece of baking paper and put on your work surface. Take the chilled and set chocolate from the fridge and invert it on top of the second piece of baking paper, then carefully peel off the baking paper from the chilled chocolate. The chocolate would now be inverted, and look like this

upload1


Now taking a sharp knife, trim the sides to get a square/rectangular shape. You need not be very precise on this, just get some neat edges. Now, using the same knife, cut it into shards. The trick is to touch the chocolate as less as possible, or not at all, because it WILL melt because of the heat of your hands.

upload2


The beautiful shards are ready!!

Rice Krispies and Strawberry Cake

Standard

My 5 year old son just loves Kelloggs Multigrain Rice Krispies, at least since past few months he is fixated on them. So the last time dear husband got the wrong kind of rice krispies, with strawberry flavour . Hmmm, so obviously, dear sonny didn’t want to even look at them.

Have been thinking of what to do with them, and since I love baking, came up with this idea. This is a cake with Strawberry flavoured Kelloggs Multigrain Rice Krispies, fresh strawberries and toffee sauce. Few of the rice krispies still had a crunchiness to them, not really sure how as I was expecting it all to be quite mushy. The taste was quite good, very moist and I think the toffee sauce added on to the moistness.

upload1

Makes a 6″ round cake

Ingredients:

For the cake:

Plain flour – 150 gms

Butter – 150 gms

Caster sugar – 150 gms

Eggs – 3, medium

Strawberry crush made with 4 med strawberries and some water – 1/4 cup or 3 tblsps

Kelloggs Multigrain Strawberry rice krispies  – 40 gms

Baking powder – 3/4 tsp

Baking soda – 1/2 tsp

Whole milk – 1 tblsp

Icing Sugar to decorate

Extra 7-8 strawberries to serve

For the Toffee Sauce: You need about 4 tblsps

Butter – 25 gms

Light brown sugar – 60 gms

Golden syrup – 70 gms

Double cream – 55 ml

Vanilla extract – 1/4 tsp


Method:

  1. Preheat oven to 170 degrees C. Prepare a 6″ round pan by oiling and dusting with flour.
  2. Sift the flour 2-3 times together with the baking powder and baking soda and set aside.
  3. Cream butter and sugar till light and fluffy. Add eggs one by one mixing well after each addition.
  4. Add sifted flour, strawberry crush, rice krispies and milk. Fold in with a spatula, mixing well. Be careful not to overbeat.
  5. Pour in the prepared pan and bake at 170 C for 30 minutes. The cake is done if a toothpick inserted in the centre comes out clean.
  6. Meanwhile, make the toffee sauce. Put all the ingredients in a hot pan and bring to boil, stirring continuously for 4-5 minutes till it thickens. Set aside to cool down.
  7. Take out from oven and leave to cool down completely.
  8. To serve, slice the cool cake horizontally and spread 2 tblsps of toffee sauce on the lower part of the cake. Spread some sliced strawberries and put the top part of the cake on it. Then repeat this on top, dust with icing sugar and serve!

upload2


Chickpea and Falafel salad

Standard

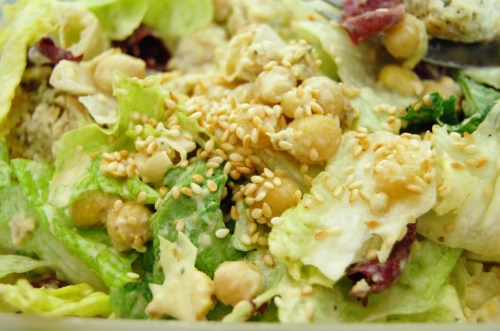
This is one of those yummmsss salads that I can eat everyday and it’s actually healthy too. Ok, it has a certain bit of oil in the falafels but hey, its all chickpeas and they are good for you, right? 🙂

This is a very simple salad and ready in a jiffy.

chickpea falafel

Serves 2 as a side

Ingredients:

Falafels – 3

Boiled chickpeas – 4-5 tblsp

Lettuce

Hummus – 2 tblsp

Lemon juice to taste

Toasted sesame seeds

Method:

Crush the falafels. Mix everything together in a bowl, except the sesame seeds and mix well.

Top with the sesame seeds and serve cold.

chickpea falafel1